Wednesday, December 7, 2011

Quick Tuesday Braise

Most Tuesday evenings I can be found heading to Milestone Crossfit, well let's be real, three nights a week and most Saturday mornings I can be found heading there ;) What that means for my cooking is not too much in the summer when I usually want quick, small, not too cooked bites.  What it means in the winter when I usually want a slowly braised hot meal is that I have to either start using my crockpot more (yes I need to do that) or figure out ways to achieve the same flavors as a good braise with less time/effort required.  The latest attempt to quickly braise something arose from the need to do something tasty in little time and the need to use up an ever growing pile of veggies coming from my Farmhouse Delivery box.  In honor of my quick Tuesday night meals here's one that will certainly make the rounds again...


Quick Braised Cabbage


Head napa cabbage, chopped
2 carrots, chopped
2 stalks celery, chopped
1 med onion, chopped
1/4 cups chicken stock
Salt, pepper to taste
2 smoked ham hocks
 
1.  Saute ham hocks in olive oil until browned, remove from skillet
 
2,  Add onion, celery and carrot, saute 2 min 
 
3,  Add cabbage
 
4.  Shred pork off hocks, add to skillet
 
5,  Add stock and season, let stock boil down till its nearly gone and serve

ENJOY!

Tuesday, December 6, 2011

Hunters Pie: Paleo Comfort Food

It's funny how your tastes change over time.  As a kid I went through a phase where I hated shepherds pie, there was something disturbing to me about all that stuff under a potato crust.  Looking back on it I think it was the inclusion of peas (mom didn't cook with them all that often but they sometimes appeared in her shepherds pie).  Peas have never been a favorite for me, still not sure that they are.  Somewhere along the way though I came back around, started enjoying the warmth that a slice of shepherds pie imparts on the eater. 

Rejoining the shepherds pie bandwagon I have come up with a recipe I like (and have shared it before), given my recent dietary changes though my pie needed to undergo a little bit of a makeover.  This time around I was inspired by a venison roast we had eaten the night before (to be posted soon), the roast was delicious and yet it also yielded plenty of leftovers.  Similar to the origins of shepherds pie (a nutritious and delicious way for shepherds to take a meal with them into the fields to tend their flocks), hunters need a nutritious and delicious way to take food with them off to the hunt.  It is deer season here in Texas so there is plenty of venison to go around combine it with some sweet potatoes and tasty root veggies you get a hearty and delectible fall/winters eve meal.

Hunters Pie
1 Medium Sweet Onion, Diced
2 Carrots, Chopped
1 Tbsp Minced Garlic
1/2 Large Bunch of Mustard Greens, Chopped
2 Medium Sweet Potatoes, Mashed
1.5lb Venison Roast, Cubed
Salt & Pepper to Taste

1. Saute Onion, Garlic and Carrots with 1 tbsp olive oil and liberal amount of ground black pepper.

2. Once onions and carrots begin to take on brown color, add meat*.  If meat isn't cooked, brown very well.  If using leftovers/cooked meat just bring to temperature.  Once meat is at desired state of brown/heated through, add greens to allow them to wilt.

3. Pour veggie/meat mix in the bottom of a 9x9 pan.  Top with mashed sweet potato.

4. Bake at 350 until top begins to brown.


*If you are not using leftovers/pre-cooked meat, season the meat well with basic, salt, pepper and garlic.

Monday, November 28, 2011

Holiday Sides for the Health Conscious

The holidays are tough with dishes full of heavy cream, butter, bread (mmm yummy bread) and all those things that the healthier set tries to limit or avoid.  What's a hungry holiday go-er to do?  How about cmoe prepared with your own tasty treats? Here are two of my favorites.

Brussel Sprouts with Tasso Ham and Smoked Cashews
1/2 lb Tasso Ham
1/2 Cup Smoked Cashews
1/2 Cup Chicken Stock
1lb Brussel Sprouts, shredded
1 Tbsp Peach Balsalmic Vinegar
1 Tbsp Garlic, minced

1. Cut fatty portion of tasso ham off, saute in large skillet to render fat; once it has cooked down add brussel sprouts and garlic and saute until sprouts begin to caramelize.
2. Add chicken stock and cook until sprouts are tender.
3. Once tender turn off heat, add vinegar and cashews.

Yes, tasso ham is a cured meat, defintiely not something you should have as an everyday food but in a side dish on occasion it's mighty tasty!   If you have a holiday ham this would be a great leftover ham recipe, just some of the tasty bits that are on/near the bone would be delicious if you don't have access to or can't get ahold of tasso.


Fancy Mashed Cauliflower
1 Large Head Cauliflower
1/4 Cup Shredded Sharp White Cheddar
1 Tbsp Vegan Butter
1 Tsp Chopped Fresh Rosemary
Salt & Pepper to Taste

1. Cut cauliflower into florets and steam until very tender.
2. Put cauliflower and butter in blender (or use a hand blender) and puree until desired texture.  I prefer it to have some texture and not be 100% smooth.
3. Mix in shredded cheddar, rosemary and seasoning.


Similar to the tasso ham which is a special occasion food, the cheese in this dish isn't strictly Paleo...it's definitely a cheat but for the holidays I feel ok making that addition.  If you don't then that's ok, you might want to add a little chicken broth/stock (very small amount) to your puree to add a little more flavor.

Thursday, November 24, 2011

Gobble Gobble Graphics

While I'm more than outspoken on my hobbies, where I live and how I eat, I don't speak much about my job here.  It has been a concious choice, I'm not sure my job is always the most interesting but to give you all a glimpse of that other part of my life I am in marketing.  Nothing super glam, I manipulate data and help pick strategies based on what that data says.  That being said, since I'm a data junkie I love a good graphic.  If you're not familiar with the term infographic, all it means is using pictures to show off information in a more consumable format.  Yes I could show you charts all day long, but a pretty picture means so much more! 

In the spirit of the day and because I love a good infographic (yes I'm a big nerd) here two cool Thanksgiving infographics I've stumbled across this last week.

Happy Turkey Day!  Read these, cook good food, be thankful and enjoy your time with family and friends!


Originally found at Huffington Post


Originally found at Visual Economics

Monday, November 21, 2011

Yes, cavemen and women ate seafood


Eating like a caveman (ok cavewoman) sounds absurd, just the idea that you won't eat things that cave-folk were unable to eat.  Then you start thinking about it, that means no boxed/preserved food right? Not so crazy.  Yes, I miss Cheetoes...oh well. It also means no legumes, no dairy and no grains.  Again, you're probably thinking I'm crazy.  Maybe I am but I also am in the best shape I've been in in years, I recover substantially faster from tough workouts than I have ever and I'm learning that I have no limits, eating like a cavewoman is only a small piece of the puzzle but it's definitely helping.   So to keep myself interested in what I'm cooking and to keep what I'm doing from becoming 'routine' I have to stay creative, which means 'paleo-fying' recipes I already loved and finding new and interesting things. 

A lot of people who make major dietary changes look for ways to force their old tastes into the box of their new diet, I'm not sure I feel that is the best answer.  If this is going to stick it's better to make the switch, embrace it and on occasion allow myself a treat that is paleo but is paleo masquerading as non-paleo goodies.

In keeping with my love of the Farmers Market (and the whole, it should be wild thing that Paleo folks recoomend), I have been buying 99.9% of my seafood from a super vendor at my local market, K&S Seafood, they always have an amazing assortment of Gulf seafood, from shirmp and oysters to tuna, flounder or snapper.  All summer long I would pick up seafood from them almost on a weekly basis, for no reason other than the fact that everything I've gotten from them has been top notch.  So in the spirit of catching up on tasty things and bringing down the queue of recipes I haven't blogged here are two of my seafood delicious dishes from this past summer.


Crab Stuffed Zucchini
1 Large Zucchini, halved with the center scooped out
1/2 Pint Cherry Tomatoes, halved
1 Medium Sweet Onion, diced
1/3 Cup Dessicated Coconut (Unsweet)
1/2 Bunch Green Onions, chopped
1 lb Lump Crab Meat, separated to remove any bits of shell
Extra Virgin Olive Oil


1. Preheat oven to 350F.  Once the oven is hot, place the zucchini halves in large glass baking dishes, put about 1 inch of water in the bottom of the dish and rub a small amount of olive oil along all exposed sides of the cut zucchini.  Salt and pepper zucchini and heat in oven until fork tender.
2. While zucchini is cooking, saute sweet onion until tender in a tsp of olive oil.  Then after onion is translucent, add remaining zucchini (what you scooped out of the center) and salt and pepper to taste.
3. Turn off heat, mix in cherry tomato halves, fold in crab meat.
4. Stuff zucchini with zucchini-onion-tomato mixture, top with coconut and green onions and put back in oven to brown.
5. Let zucchini brown, if the water has completely evaporated add another inch of water to keep things from drying out.

Poor Girl's Cioppino
1lb Snapper Filets, cut into 2 inch cubes
1 lb Lump Crab Meat, separated to remove any bits of shell

2 Fresh Hatch Chiles, seeded and stemmed
1 Bunch Green Onions, chopped
1 14.5oz cans of fire roasted chopped tomatoes
1 Medium Sweet Onion, Diced
1 Tbsp minced garlic
Extra Virgin Olive Oil

1. Saute sweet onion and garlic in a tablespoon of olive oil until onion is translucent.
2. Once onion is cooked add 1 diced hatch chile and saute for about two minutes.
3. Add tomatoes and one can of water, let it come up to a boil.
4. Turn down heat so that broth/soup is simmering, let it simmer for 20 minutes.  Add salt/pepper to taste.
5. Add snapper and let it cook for about 5-10 minutes (depending on the size of the pieces you cut, you just want the fish to cook in the broth) then turn off soup and add crap in.
6. Serve topped with a slice of hatch chile and chopped green onions.


Wednesday, November 16, 2011

Apples to apples

Somewhere between Halloween, the time change and today I realized the holidays are about to come crashing down upon me.  Scary thought, 10 days to Thanksgiving...OMG what is a girl to do?  Well this girl will start arming herself with all forms of delicious veggie sides, some kind of turkey recipe (we usually turn to a brined turkey but maybe something new) and of course a dessert.  It doesn't seem so overwhelming yet but just wait, I'm sure the stress will start getting to me.

Before pilgrims, turkeys and cornucopias come flying my way I want to share some non-turkey influenced recipes centering around my favorite fall ingredients...apples!  I have always enjoyed apples in the fall, between caramel apples, apple cider, apple baked goodies and just plain delicious apples it feels like fall when they are around.  I was super excited the last few weeks to receive apples in my Farmhouse Delivery box, who can beat local apples after all?   For those of you unfamiliar with Farmhouse Delivery, they are a very cool service from here in Austin that delivers bi-weekly or weekly produce boxes to your home or office.  While I am slightly outside their delivery zone I get a weekly box delivered to my parents house; each Thursday. I greedily look forward to the contents of that box  starting long before pickup on Thursday and then happily share it with my family.  It is a constant reminder of the diversity of products available in this area.  On top of the produce that is routine (and ever changing) in each box, you can order meats, canned goods, eggs, cheese and other extra grocery goodies to be delivered as well.  It's amazing how a $39 box has decreased my grocery store trips!  The other neat perk to this is that while they will swap out items due to dietary constraints, having that box delivered with whatever is available, fresh and seasonal means you have to work with it.  Just like other CSA-type programs I have opened up my box to find everything from pears to grapefruits and greens or even turnips (no, I don't know what I'm doing with those yet).

Running backwards after my trip down the Farmhouse Delivery rabbit hole...the main event today, apples. 

First up, a twist on a Cooking Light recipe, Savory Baked Apples.

Stuffed Savory Apples
Inspired by Cooking Light

2/3 cup chicken broth
4 large Honeycrisp apples, cored
1 lb ground pork 
3/4 cup finely chopped sweet onion
1/8 teaspoon ground red pepper
3 garlic cloves, minced
1/4 cup chopped walnuts, toasted
3/4 teaspoon kosher salt
1/2 teaspoon dried rubbed sage
1/2 cup sharp white cheddar, shredded (optional)


1. Preheat oven to 350°.
2. Using a small spoon, carefully scoop out centers of apples, leaving a 1/2-inch-thick shell, and chop apple flesh. Brush the inside of apples with a small amount of broth. Place apples on a baking sheet, and bake at 350° for 25 minutes or until just tender.
3. Preheat broiler to high.
4. Heat a large skillet over medium-high heat. Add pork, and sauté 5 minutes, stirring to crumble. Remove from pan; drain. Add chopped apple, onion, sage, salt and red pepper, sauté 4 minutes. Add garlic; sauté for 1 minute, stirring constantly. Add pork, onion mixture, walnuts and divide mixture evenly among apples; top with cheese. Broil for 5 minutes or until golden.


This year the Honeycrisp apples have been delicious, I will eat two maybe three in a day (if they aren't the massively big ones).  Apples appear in stuffings (haven't found my 'paleo' alternative to the bread yet), soups, stews, baked with cinnamon and agave nectar over the top and now as a main dish.

Apart from the stuffed apples, I also made a mean pork-apple soup a few nights back.  I don't mind soups, as a rule I used to love them as an excuse to have a nice crusty loaf of bread around, I think that's part of why I've avoided having a lot of soup since switching to my mostly-paleo diet.  Frankly this soup was delicious and would've been tasty with some crusty warm bread but being a good girl there was none to be found!

Pork & Apple Soup


2 tablespoons olive oil
1 pound pork sirloin, cut into 1 1/2-inch cubes
Salt and pepper
1 onion, chopped
1/4 teaspoon caraway seeds, (optional)
4 cups chicken stock
1 cups water
1 tablespoon Dijon mustard
1/2 pound green cabbage, shredded (about 2 cups)
2 tart green apples such as Granny Smith, unpeeled, cut into 3/4-inch chunks
2 tablespoons chopped fresh parsley

1. In a Dutch oven, heat 1 tablespoon oil over medium-high heat. Toss pork with 2 1/2 teaspoon salt, and 1/4 teaspoon pepper. Add meat to the pan, and brown, turning occasionally, about 6 minutes. Transfer to a plate.
2. Reduce heat to medium-low, add remaining 1 tablespoon oil, onion, and caraway seeds, if using, and cook until onion softens, about 3 minutes. Stir in stock, water, mustard, cabbage, pork, and 3/4 teaspoon salt. Bring to a boil, reduce heat, and simmer, covered, for 15 minutes. Add apples, and continue cooking, covered, for 10 minutes.
3. Just before serving, stir in chopped parsley. Be careful not to simmer soup too long, extensive cooking will turn the pork tough.


The final recipe isn't as detailed, or even a recipe so much but instructions on making one of my favorite desserts.  It's quite simple really, core an apple (or two or three or pears or both), put it into an oven safe dish.  Put a few teaspoons of agave nectar or honey as well as flax seed granola (one of my favorite local finds - Flax Z Snacks) and then toss it in the oven (350F) until the fruit is tender.

Monday, October 17, 2011

Tagine Tuesday?

I am always on the lookout for new and interesting ways to cook things, my family (who knows this) gave me a very cool birthday gift this year (aka a new way to cook stuff), a tagine.  Tagines are a North African/Moroccan earthen ware pot that traditionally is made out of heavy clay.  Not all tagines are glazed but some are beautifully painted and some are glazed, thankfully mine is, it made clean up a breeze.  These days you can find a fantastic tagine at any good kitchen store in material ranging from clay to enameled cast iron.  Tagines are great for braising tougher cuts of meat, they slowly let the contents simmer away in their juices while the dome provides a crock-pot like environment where the steam stays trapped inside the dish.  The result: deliciousness!  


Image from Emily Avila

Last week I was feeling inspired (and needed to use a whole chicken I'd purchased) and cut up a chicken and veggies and seasoned it before I went to CrossFit.  There is nothing better than walking in the door after a hard-fought workout to the smells of a simmering dinner.  The possibilties for the tagine are endless, the spice, protien and veggie combos are infinite, I can't wait to cook up something else new, I have a feeling that I might start seeing the tagine in action a lot more.


Moroccan Chicken Tagine
2 teaspoons paprika
1 teaspoon ground cumin
1 teaspoon ground ginger
1 teaspoon tumeric
1/2 teaspoon cinnamon
1/4 teaspoon freshly ground pepper
2 Tbsp olive oil
1 chicken, 3-4 lbs, cut into 8 pieces
1/4 teaspoon kosher salt
3 cloves garlic, minced
1 onion, chopped
1 lemon, sliced into 1/2 inch thick rounds
1 cup green olives, pitted
1/2 cup water
1/2 cup chicken stock
1/2 cup dried apricots

1. Combine all the spices in a large bowl. Pat dry the chicken pieces and put in the bowl, coat well with the spice mixture. Let the chicken stand for one hour in the spices.
2. In a large, heavy bottomed skillet, heat the olive oil on medium high heat. Add the chicken pieces, sprinkle lightly with salt (go easy on the salt, the olives and lemons are salty), and brown, skin side down for five minutes. (If you are using a clay tagine, you will skip the browning step, and bring oven up to 325F.) Lower the heat to medium-low, add the garlic, onion, apricot and liquids.  If using clay tagine, bake in oven for 3 hours instead of simmering.


Monday, October 10, 2011

Sweet treats for grain-free birthdays

Going without grain has gotten spuer easy, on very rare occasions do I lament the loss of it, however, knowing that my sister's birthday would create some serious temptation I tried to find something that would be a suitable alternative. So this Saturday while I was watching my poor Longhorns get schooled by a team I do not care for (don't worry, I've never liked the Sooners, my dislike isn't anything news), I made these declisious Paleo Cocoa Bites.

Paleo Cocoa Bites
1/2 Cup Cocoa Powder
1/2 Cup Almond Meal
1/2 Cup Dessicated Coconut
2 Tbsp Coconut Butter
2 Cups Dates, Pitted

1. Soak the dates in just enough water to cover them for 4-6 hours, drain water off
2. Blend in blender with remaining ingredients
3. Roll into balls, chill and serve

These are so good, the don't even taste like they have dates (I'm new to even wanting to eat dates, much less liking them), I can't wait to try other variations on this theme! 

Thursday, October 6, 2011

Apologies and Smothered Chicken...

While I really want to dive into discussing my favorite fall treat or tell you how I have had Halloween decor up way too long already (it's one of my favorite holidays) I first should apologize for what has been a lack-luster ability (on my part) to keep a regular schedule for posting on my blog.  I feel like I go through these phases where I post like crazy and read everyone else's fabulous blogs and comment and then I end up on the other end of the pendulum and post infrequently (at best) and get really behind on reading about other people's exploits. Life makes things tough but it's not even really my schedule that has cause my absence of late, it's more been a problem of writers block. 

As I mentioned earlier this summer, I have gotten involved with a local CrossFit gym, well that's an understatement, I love the place!  I love the challenge of each day's WOD, I love the people, I love the way I feel when I walk away knowing just how strong I am and how much stronger I've become since starting CrossFit in May.   I adore every aspect of CrossFit and have learned so much about myself being involved in this sport, the other thing that has been a natural evolution from my involvement is an overhaul of my diet.  Through our gym's six week challenge this summer I became very closely acquainted with Paleo-Zone eating, after the challenge I told myself there was no going back and for the most part I haven't.  I have cheated occasionally (had a bite of traditional b-day cake on my birthday....it was really really sweet tasting), made some gluten-free (not grain free) mac 'n cheese but really on the whole I have been good.  Why does this matter, because it means I haven't really been sure what to post.  This blog started out being my sounding board for ideas and more often than not feats of deliciousness but delicious things that are outside the realm of my new eating habits...now, with a different perspective on things I struggle with what recipes to post, what is interesting enough to share.

I'm learning that interesting enough isn't the right phrase anymore, I will share things that might not be as 'interesting' as what I used to think blog-worthy recipes were.  I'm sorry if my recently rekindled health-nut side isn't appealing, I'll apologize now but it's where I've been lately and where I see myself in the future.

Lately I've been looking for recipes that are quick enough to make on my only non-CrossFit weeknight (read as the only night I have time to cook a slightly more time-consuming meal) but also suited to my grain-free, dairy-free (mostly), legume-free diet...I've been making a lot of spaghetti squash, a lot of chicken and a lot of stir-fry lately.


What I wanted to share today is pretty basic (technique-wise) but was a delicious weeknight dinner and is something I've repeated at least three times with different proteins (yea for seafood and chicken!). 
 
Heirloom Tomato Smothered Chicken
4 Large Heirloom Tomaotes, cut into cubes
1/2 Cup Fresh Basil, corn
4 Slices Bacon
1 Small Onion, chopped
1 Tsp Minced Garlic
1 Tsp Olive Oil
3 Chicken Breasts
Salt & Pepper to taste
*1/2 Cup Dry White Wine or Chicken Stock
 
1. Cook bacon in a medium/large cast iron skillet until crisp.  Once crisp remove from pan and keep 2 Tsp of rendered bacon fat.
2. Season chicken with salt and pepper then brown in skillet.  Remove chicken from skillet and saute onions and garlic until onions are tender and starting to brown, add olive oil if extra oil is needed.
3. Add chicken back into skillet and add tomatoes and wine/stock.  Bring to a boil and then let simmer until chicken is cooked through.
 
This recipe produces plenty of extra veggie/sauce, it's great re-used the second day as a sauce for spaghetti squash or over another protien like snapper, scallops, shrimp or pork chops.
 
Bell Pepper Slaw 
2 Ribs Celery, sliced into thin, match-stick like pieces
1 Each, Orange, Red and Yellow Bell Pepper, thinly sliced to match celery
1/4 Cup Fresh Basil (or other herbs), chopped
1/2 Cup Champagne Vinegar
4 Tbsp Truffle Mustard (or Dijon Mustard)
Salt & Pepper to taste

1. Whisk vinegar and mustard together to combine.
2. Toss sliced celery, bell peppers and basil with vinegarette, season to taste.

*This salad would also be super tasty with sliced, fresh fennel in it.

Wednesday, September 14, 2011

Canning Summer

The last two summers Mom and I have spent a lot of time canning, everything from jams and jellies to various dilled vegetables. This summer was a little slower than last because with the hottest summer on record (ever, anywhere) there wasn't an abundant source of veggies in my backyard like there had been in years past. Don't get me wrong, we managed to do a few batches of pickles, plenty of jam for gifts and even some interesting things like prickly pear tuna sauce but it wasn't the bounty of last summer. Early in the summer one of the local farms, Johnson's Backyard Garden had a glut of tomatoes (I know, horrible problem, right?). So what to do with super priced, super ripe tomatoes? Can them of course!

I'm not usually one for step-by-step photos but given the simplicity of a written recipe for canning tomatoes I felt it was appropriate here.

For each quart jar of tomatoes you will need:
Approximately 3Lbs of Plum or Roma Tomatoes, we canned San Marzano's
2 Tbsp Bottled Lemon Juice or 1/2 Tsp Citric Acid
1 Tsp Salt

1. Wash your tomatoes very well, then mark an X on the bottom of them and plunge them into boiling water. Allow them to sit in the water and blanch for 30-60 seconds. Put the tomatoes into an ice bath after they have been removed from the boiling water. Core them and peel away the skin with a small paring knife.


2. Put the lemon juice (or citric acid) and salt into clean, sanitized jars. Pack the tomatoes into the jars one at a time, press firmly enough to compress the tomatoes and release a little juice but do not crush the fruit.


3. Cover full jars with liquid (either tomato juice or water) so that only 1/2 inch of space exists between the top of the jar and the liquid.


4. Place jars into a pot of boiling water to seal them, process for 85 minutes.


Canned tomatoes are a great way to preserve the best of summer and enjoy the ripe tomato flavor anytime.

Tuesday, August 9, 2011

Crabby Summer Delights

After last summer's oil spill Gulf seafood has been back on the market and better than ever. My first foray into using coconut flour came when I picked up an amazing container of lump crab at the farmers market a few weeks back, I was confronted with a big pile of really fresh sweet crab..everything that came to mind involved things I shouldn't be eating so I was stumped. No crab-mango salad (mango is on the 'unfavorable carb list for now), no crab gratin (cheese isn't on the list either), crab cakes would be fabulous but the breading...how to solve the breading problem? Then, while wandering around the internet I found the solution...coconut flour!

First up, Paleo Crab Cakes...

1 LB Crab Meat
2 Tbsp Finely Diced Shallot
2 Tbsp Mayonnaise
Zest of 1 Lemon
1 Tsp Minced Garlic
Creole Seasoning, to taste
1/8 Tsp of Ancho Chile Powder
1/4 Cup Egg White
2 Tbsp Coconut Flour
2-4 Tbsp Coconut Oil

1. Mix the crab with the shallot, mayo, garlic, sea salt, pepper, chipotle, egg, lemon zest and coconut flour.
2. In a large skillet, heat the coconut oil over medium heat for 1 minute or until hot enough that a sprinkle of water in the pan makes the oil sizzle.
3. Form the crab cake mixture into palm size patties and fry for 2-3 minutes on each side or until they are golden brown. Makes approximately 10 crab cakes.

I served these atop a salad that was lightly dressed with lemon juice and olive oil. If you follow a zone diet, these crab cakes are 1.5 blocks of protein and 0.25 blocks of fat each.


Since turning my crab into cakes I've used canned salmon (not idea but it was on hand) to the same effect, turning my salmon cakes into a Thai inspired tasty lunch treat!

Thai Salmon Patties
1 Tsp Red Curry Paste
6oz Can Salmon, drained
2 Tbsp Coconut Flour
1 Tsp Minced Garlic
1 Diced Shallot
1/4 Cup Egg White
2-4 Tbsp Coconut Oil

1. Mix the salmon, curry paste, garlic, shallot, egg white and coconut flour.
2. In a large skillet, heat the coconut oil over medium heat for 1 minute or until hot enough that a sprinkle of water in the pan makes the oil sizzle.
3. Form the mixture into palm size patties and fry for 2-3 minutes on each side or until they are golden brown. Makes approximately 3 medium sized salmon patties or 2 large sized patties.

I served these atop a salad that was lightly dressed with a mixture of sesame oil and rice wine viengar. If you follow a zone diet, these salmon patties are 3 blocks of protein and 1 block of fat each.


Side note, I know that these both look the same, the salmon vs. the crab, if you used fresh salmon and cubed it up or flaked a freshly cooked piece of salmon vs. canned you would see a more 'pink' patty. I was pretty excited about the possibilities here and plan to try a mixture of raw tuna with the coconut flour, etc, raw salmon or even diced shrimp to create tasty burgers patties too. Needless to say these don't taste like 'health' food to me!

Friday, August 5, 2011

Crossing my limits

It's been a long hot summer here in Texas, so hot I've barely been doing much cooking....and when I do get around to cooking there isn't much blog-worthy. We're approaching a record number of 100+ degree days, yipee! Seriously, who gets excited about breaking a record like that?? So what do I choose to do in this scorching oven known as my home-state? I joined a group of fitness crazed folks and have started going to CrossFit. I'm not sure if you know what that is or if you do know if it elicits images of crazy people doing boot camp-esque workouts but it doesn't matter, I love it. I blame my sister and her boyfriend for getting me involved in this, as you can see, Jackie is just as involved as I am (or obsessed).

What is CrossFit you say? Well according to the CrossFit website it's a strength and conditioning program built under the principle that you shouldn't specialize in any one thing but that you should excel at many. Everything is scaled to suit your own fitness level so an elite military or law enforcement officer can do the same main workout that say an out of shape food-blogger can do...we might do different amounts of weights or a variation on the same exercise but it is the same workout regardless. Why CrossFit? Because it's addictive, the competition it fosters (you vs. you), the shared goals among your classmates and team environment as well as the sense of accomplishment you get after pushing through a workout that you thought you would never be able to complete. That coupled with the fact that it's helped me get into much better shape (miles to go still but in the short few months I've done it I've seen immense changes) makes me a devoted follower these days.

Enough preaching about CrossFit....I shared this because while working out I have also started to adopt the eating habits that are prevalent among CrossFitters...which is a combination of the 'paleo diet' (basically lots of fruit and veggies, gluten free and good proteins) and a zone diet (again, lost of fruits and veggies, limited grains, if any, and quality lean protein). Being food-obsessed this was a bit tough for me at first, I have no gluten sensitivity and frankly love to try new things so the thought of limiting myself to these confines really bothered me at first. Slowly though I have adapted, partly because our CrossFit gym (much love to Milestone Crossfit!!) set up a 6-week challenge which I eagerly joined and partly because I have seen what the combo of this diet and CrossFit does for people. In four weeks my 'cravings' for grains and super-sweet candy, etc. have dwindled (not going to lie here, I would still kill for hot-buttered fresh baked french bread!) and I feel great. So again, why am I sharing all this? Because it will color a lot of what I will be posting in the near term, most of my coming posts will be recipes that have been made since the beginning of my 6-week challenge and will be reflective of ingredients that are 'zone-paleo' friendly. So be wary those of you who aren't so excited about 'healthy' food, these things will all be slightly better for you than most that I have posted in the past but none of them will taste like 'health' food, I refuse to give up good food for just healthy food.

To that end, the first recipe I want to share is a re-vamped version of something I have posted before, Mustard Green Pesto with Chicken Meatballs, only this time instead of pasta it is served over Spaghetti Squash.

Spaghetti Squash with Mustard Green Pesto & Chicken Meatballs

1 lb Mild Turkey Breakfast Sausage or Ground Chicken or Ground Turkey
1 lb Chicken-Apple Sausage*
3 Tbsp Almond Meal
1 1/2 Tbsp Rubbed Sage
1 Tsp Salt
1 Tsp Black Pepper
1 Cup Apple Cider, reduced down to 1/4 cup to create a syrup
2 Lg Bunches Baby Mustard Greens
5 Cloves Garlic
1/4 Cup Olive Oil
1/3 Cup Pecan Pieces, Toasted
1 Tbsp Cider Vinegar
1 Tsp Salt
1/2 Cup Pine Nuts, Toasted
1 Red Bell Pepper

‎1. Cut the spaghetti squash in half, scoop out the seeds and rub 1 Tsp olive oil around the inside, sprinkle with a touch of salt and pepper. Roast at 375 F until fork tender.

2. Fold bulk sausages together wtih 1 tsp salt, 1 tsp pepper, rubbed sage and reduced cider. Do not over work the mixture, shape into balls and place in a greased 13 x 9 pan. Bake at 400 F for 25 minutes. Can be baked concurrently with spaghetti squash, squash will be ok at 400 F.

3. Remove squash from oven and let cool for 5 minutes and use a fork to scrape out the flesh of the squash with a fork. Place in a large bowl/dish.

2. While the meatballs are baking, blend the mustard greens, garlic, olive oil, cider vinegar, 1 tsp salt, pine nuts and pecans.

3. Slice bell peppers, leave raw. Toss meatballs, pesto and bell peppers together and serve on top of cooled squash flesh.


Tuesday, June 21, 2011

Hot Summer Cold Dinner

I don't know about where you are but where I am it's lethally hot, literally between May and June we already have exceeded our annual average number of 100 degree days (average is 12) by 3 days and it's not even officially summer yet! What is a girl to do? Well aside from barricading myself in my house, shutting the blinds and cranking the AC I have to find ways to make due. Part of 'making due' includes trying to keep the stove turned on as little as possible so I've been making a lot more salads and no-cook meals.


Cool as a Cucumber Tuna Salad

2 Large Cucumbers, Peeled and Sliced into half-moons
1 Fennel Bulb, sliced thinly
3 5-oz cans Tuna packed in olive oil, drained and flaked
2 Tbsp White-truffle Dijon Mustard (or Dijon would substitute fine)
2 Tbsp Champagne Vinegar
2 Tbsp Olive Oil
2 Tsp Poppy Seeds
Salt & Pepper to taste

1. Place veggies and tuna in a large bowl together.
2. Whisk mustard, vinegar, olive oil, poppy seeds and salt/pepper together.
3. Pour over tuna and veggies, mix well, serve!


Someone I have yet to introduce, the newest member of my family, Sam. He joined the family the day before Easter and has been finding his place in the house quite easily.


He's certainly enjoying himself (nagging my dad). His brother Jack has adjusted quite well to him (thank goodness) too. Now if I could just get him to quit using his loud-high-pitched puppy bark...that'd be a trick!

Sunday, June 12, 2011

Beets....a stain on my heart (or face and hands)

Many moons ago when I was a baby my parents fed me beets, the photo lives on in infamy...really it's haunted me for years at many a family gathering.

So I ask how does one overcome such humiliation at such a young age? Beet 'em of course! Ok so that was pretty bad beet humor but oh well. In my zeal for local produce I've found that beets are ever-present this time of year at our farmers markets, not quite up to the challenge yet I ignored them last year and then early this year I tasted an amazing golden beet salad at Whole Foods, that was it, the hunt was on! I have taken to oven roasted beets with a variety of different oils/vinegars/spices atop them. One of my favorites is a salad similar to the golden beet salad I loved at Whole Foods...

Golden Beet Salad with Goat Cheese and Sage
3 Medium Golden Beets, diced (approx. 1 inch cubes)
Olive Oil
1/2 Cup Sage, sliced in a chiffonade
3 oz Goat Cheese
2 Tbsp Balsamic Vinegar
Salt & Pepper

1. Preheat oven to 375 F
2. Toss beets with olive oil and salt and pepper to taste
3. Place beets in 13x9 oven dish and roast beets until tender, approximately 30-45 minutes.
4. Remove beets from oven and let cool 10 minutes.
5.Chop up goat cheese (or crumble) as best you can. Place beets in a large bowl, top with sage and goat cheese, drizzle with vinegar.

While I adore this salad and have made a handful of variations on it, including adding blanched green beans, roasting the beets with various vinegars in the mix, using smoked salts, etc. I definitely tired of it. I started investigating the other ways to eat beets...(hear the sound of crickets??) there aren't many, at least not that I found appetizing. So I came back to the fact that I really like them roasted but needed something else.


Another variation on this included Chioggia, Golden and Red Beets, it's beautiful while it's being roasted (and then eaten!). I also swapped out basil for the sage.


Because I really liked the way the beets were off-set by the flavor of the goat cheese I decided to serve roasted beets alongside a goat cheese risotto.

Basil, Speck and Goat Cheese Risotto

Ingredients

2 tbsp olive oil
4 small shallots, diced
4 cloves garlic, minced
1 cup Arborio Rice
1/2 cup dry White Wine
2 1/2 cups Chicken Stock
1/2 cup Goat Cheese
salt and pepper to taste
1/2 cup diced Speck
Spice Globe Basil, thinly sliced (chiffonade)as garnish

1. In a large skillet heat the olive oil over medium high heat.
2. Saute shallot until soft. Add the garlic and saute for another minute more.
3. Add the Arborio rice to the skillet, making sure to stir it around in the olive oil so that each granule is coated, and toast it for about 2 minutes.
4. Next add the white wine and stir the rice. Wait until all the wine has been absorbed and then start adding the chicken stock 1/2 cup at a time, making sure not to add more until the previous addition has been absorbed.
5. Once the rice is just tender, add the Goat cheese and let it melt in, mix well. Remove from heat and season with salt and pepper to taste and sprinkle with the Spice Globe Basil and Speck.


It's funny, sometimes the things you think you hate the most come back as favorites.

Friday, June 3, 2011

The Noblest of All

Tucked away in the recesses of Cedar Park, TX (aka suburbia) you expect to find many a big-box chain restaurant and fast food location. If you guessed those are the only things in Cedar Park you guessed wrong! Alongside the soccer-fields and the mall you can find Noble Pig, the brain child of two talented chefs, John Bates, who you may be familiar with from his time at Asti and/or Wink, and Brandon Martinez, has spent time at the Inn at the Anasazi, in Santa Fe and Aquarello in San Francisco. At the core Noble Pig is a sandwich and breakfast shop, however if you step back you realize it is the convergence of a bounty of locally sourced foods, handmade condiments and breads and delicious food.


Mid-May I was one of a few lucky food-writers/bloggers invited to a tasting dinner at the shop. We enjoyed a multi-course menu that explored the breakfast, lunch and dessert offerings regularly featured on the menu as well as a terrific treat, a charcuterie platter to start off the evening.

The charcuterie platter was delicious, a Country Style Pork Pate, Sweet Italian Sausage, Linguisa Sausage, and Shiner Bratwurst. served alongside olive-oil pickles and a homemade mustard.


The country style pate was probably my favorite, I'm a sucker for a good pate! Each sausage had robust flavor, on previous visits to Noble Pig I have seen some of their sausages for sale in the case, after tasting each of these I will certainly be back to purchase some.

After the charcuterie we were served a selection of two of the breakfast items, a Biscuit Stuffed with Pecan-Smoked Pork Belly and Cheese and a house-made Chorizo and Egg Torta.


While both were quite tasty the biscuit remains my favorite, I'm a good Southern girl and any kind of biscuit is close to my heart!

Up next were the sandwiches two by two, first up were top-sellers Smoked Duck Pastrami with Russian Dressing and Rye Pickles and The Noble Pig, an unctuous combination of spicy ham, pulled pork, provalone and bacon. For this pig-obsessed pork lover The Noble Pig is a little slice (or big if you're ordering the regular size sammy) of heaven. The Duck Pastrami is also made in-house and is a delicious twist on a classic sandwich.


Note the house pickles on the corner of the tray, as some one who is picky about pickles I found these to be delicious, just like something mom would make. The second tray of sandwiches featured the Thai Chicken with Jalapeno-Cabbage Slaw and Cilantro and the second was something that would be more of a 'feature' than a regular item, Beef Tongue, slowly braised then sliced and seared, served with Manchego cheese, roasted red peppers and a fresh made mustard.

I adore all things Thai and found the Chicken sandwich delicious, the Jalapeno-Cabbage slaw is a great addition to the sandwich but can also be found as a side on the regular menu (it's well worth grabbing a full-sized serving of it). I've only eaten tongue a few times but if it all tasted like this sandwich I'd eat it far more often! The manchego cheese was a perfect accompaniment to the beef, paprika and peppers.


The last course of our tasting was one near and dear to my heart, dessert. My previous trips to Noble Pig had ended with a jar full of their ambrosia-like nectar of Spiced Chocolate Pudding so when I saw it on the menu I was already in heaven. The trio of desserts was Pecan Meringue filled with Spiced Pudding, Buttermilk-Basil Pie and Nutella Stuffed Blueberry French Toast. And yes each one was as good as it sounds.


While I don't think I could pick just one of these in the future, and I dearly love the pudding I think the Buttermilk Basil Pie was the biggest eye-opener for me. I love buttermilk pie as a rule and found the addition of basil to be enlightening, it truly opened my eyes to all kinds of possibilities for one of my favorite classics!


While our servings were smaller (tasting menu and all) the regular servings are generous (although sharing might turn into a fight over the goods instead!).


I highly recommend a stop by The Noble Pig, if you're in Cedar Park check them out, they are open Monday-Thursday 6AM-3PM and Friday-Sunday 6AM-5PM.

Wednesday, May 18, 2011

Bakers Delight

My first forays into cooking were always about baking, cookies, attempts at brownies and cakes (cupcakes even). They were always a need to feed my own sweet tooth and then slowly but surely I realized how much I enjoyed cooking as opposed to the precision of baking. Cooking requires far less precision, a dash of this and a pinch of that vs. the measured strictness of baking. Occasionally I still find myself baking, it's infrequent, mainly because I shouldn't be eating it as much as I wish I could, so when I can make my baking healthy I'm a happy girl. Two of my favorites taste bad for you but really aren't that bad with their whole wheat flour and oil alternatives.

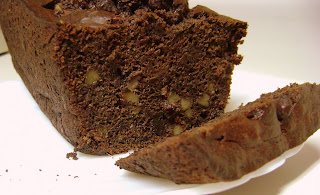
Chocolate Banana Bread
1 Cup Sugar
1/2 Cup Applesauce
2 Eggs
1 Cup Whole Wheat Flour
3/4 Cup All Purpose Flour
1/4 Cup Dutch Process Cocoa Powder
1/2 Tsp Salt
1 Tsp Baking Soda
1 Tsp Baking Powder
1 Tbsp Flax Seeds
1 Tsp Vanilla
1/4 Tsp Cinnamon
1/4 Tsp Nutmeg
1 Cup Walnuts
1/2 Cup Chocolate Chips

1. Preheat oven to 350F and prepare a loaf pan.
2. Cream sugar, applesauce and eggs. Add bananas and vanilla extract.
3. Sift/whisk together dry ingredients.
4. Gently fold dry and wet ingredients together. Add flax seeds, walnuts and chocolate chips.
5. Bake at 350F until the top is firm and a toothpick comes out clean (appx 45-50 minutes depending on how deep the loaf pan is).


Banana Caramel Muffins
2 Large Eggs
2/3 Cup Light Brown Sugar
1 Cup Mashed Bananas (2 Medium Bananas)
1 Cup Buttermilk
1 Cup Wheat Bran
1/4 Cup Vegetable Oil
1 Tsp Vanilla
1 Cup Whole Wheat Flour
3/4 Cup All Purpose Flour
1 1/2 Tsp Baking Powder
1/2 Tsp Baking Soda
1/2 Tsp Cinnamon
1/4 Tsp Salt
1/2 Cup Dark Chocolate Chips
1/2 Cup Diced Dulce De Leche (Goya makes a bar form of this but if you can't find it caramel chips would be fine)

1. Preheat oven to 400F.
2. Whisk eggs, banana, buttermilk, oil, vanilla and bran together
3. Whisk dry ingredients together. Add moist and dry ingredients together, mix well.
4. Stir in chocolate and caramel. Scoop into muffin wrappers in a muffin tin.
5. Bake 15-25 minutes, until the tops are golden brown.

I have to apologize now, the photo isn't stellar, it was a cell phone camera pic.

Tuesday, May 10, 2011

Cioppino

A few years back I took a business trip to San Francisco, while there I had some of the best seafood I've had in years and have since spent time trying to replicate some of those vittles. While the cioppino I ate there was amazing I certainly can't down-play how great this recipe is...it's well worth the expense in seafood!

Cioppino

1/4 cup olive oil
1 1/2 cups chopped yellow onions
3/4 cup chopped green bell peppers
3/4 cup chopped celery
1/4 cup chopped fennel
2 tablespoons minced garlic
1 bay leaf
1 teaspoon salt
1 teaspoon dried oregano
1 teaspoon red pepper flakes
1/2 teaspoon dried fennel seeds
1/2 teaspoon dried thyme
1/2 teaspoon ground black pepper
2 tablespoons tomato paste
1 cup dry white wine
1 (28-ounce) can crushed plum tomatoes and their juices
1 8oz bottle clam juice
4 cups chicken broth
1 pound mussels, well scrubbed and de-bearded
1 pound firm fish, such as halibut or snapper, cut into 1-inch cubes
1 pound medium shrimp, shelled and deveined
1 pound lump crab meat
1/4 cup chopped fresh parsley
1/2 cup freshly grated Parmesan
1/4 cup chopped green onions, green tops only
Sourdough bread, accompaniment

1, In a large pot, heat the oil over medium-high heat. Add the onions, bell peppers, and celery, and fennel, and cook, stirring, until soft, about 4 minutes. Add the garlic, bay leaf, salt, oregano, red pepper, fennel seeds, thyme, and black pepper, and cook, stirring, until fragrant, about 1 minute. Add the tomato paste and cook until starting to brown, about 2 minutes. Add the white wine, stir to deglaze the pan, and cook until half of the wine is evaporated, about 2 minutes.

2. Add the plum tomatoes and their juices and the fish stock and bring to a boil. Reduce the heat and simmer, partially covered, for 30 minutes. Add the mussels and simmer until the shells open, about 6 to 7 minutes. Remove and discard any unopened shells.

3. Lightly season the fish and shrimp with the salt and pepper, and add to the pot. Simmer, covered, until cooked through, about 5 minutes. Remove from the heat and discard the bay leaf. Stir in the parsley. Ladle into large soup bowls and sprinkle each serving with Parmesan cheese and green onions.

Serve immediately with hot bread.


Thursday, April 28, 2011

Experiments in Home Curing

As I've recently professed my obsession with charcuterie it shouldn't be surprising to see meat curing, smoking, etc. appearing on my blog, I give you the preface so that you aren't surprised as more and more of these items start appearing. Last summer I learned to can (thanks Mom!) and rejected all fear of botulism or poisoning my family and friends with my canned goodies. This summer I will conquer the slightly more difficult (in my mind) art of curing meat, starting with salmon.

Many many moons ago, during the middle ages, gravlax was made by fishermen who salted and fermented salmon by burying it in the sand above the high-tide line. The word gravlax comes from the Scandinavian word grav, which literally means "grave" or "hole in the ground, and lax (or laks), which means "salmon", thus gravlax means "buried salmon." While fermentation is no longer part of the process, salt and curing for a few days certainly are.

Gravlax
1 Cup Kosher Salt
1/2 Cup Sugar
2 Tbsp Whole Peppercorns, lightly crushed
1 Bunch Fresh Dill
2 Lbs Fresh Salmon, Cut into 2 pieces
1/4 Cup Gin

1. Place the one piece of the salmon (skin-side down) in a dish you can zip into a freezer ziploc bag.
2. In a bowl mix together the salt, sugar and peppercorns. Sprinkle half the mixture on top of the piece of salmon in the dish. Place the dill on the salmon and pour remaining salt mixture on top, lay second piece of salmon, flesh-side down on top of the other piece.
3. Pour gin over the salmon. Zip salmon up removing as much air as possible and place in fridge.
4. Turn salmon every 12 hours, cure for 48-72 hours.
5. After it is cured to your liking, wipe salt mixture and dill off of salmon using a damp paper towel. Salmon can be stored wrapped in wax paper and in a ziploc back for up to 12 days.

While I used the exact ingredients above for my Gravlax I will likely substitute brown sugar for the regular white sugar next time. I think the brown sugar flavor will meld better with the flavors of the salmon and cure. Gravlax can be served by slicing it thinly and eating it with cream cheese and bread or a bagel. I found a great springy salad in Eugenia Bone's cookbook, Well Preserved that used Gravlax as well.

Gravlax and Shaved Fennel Salad
Well Preserved by Eugenia Bone

2 Fennel Bulbs, Greens and Core Removed, Shaved
12 Slices Gravlax (about 1/2 lb), cut into 2 inch pieces
1 Tsp Dijon Mustard
1 Tbsp Fresh Lemon Juice
Salt and Freshly Ground Black Pepper
1/4 Cup Light Oil, Like Safflower
2 Tbsp Minced Fresh Chives or Dill

1. In a small bowl, combine the shaved fennel and the gravlax.
2. Prepare the vinaigrette by whisking the mustard, lemon juice, salt and pepper (to taste). Add the oil in a slow dribble, whisking all the while, until you have used all the oil and the vinaigrette thickens.
3. Toss the fennel and gravlax in the vinaigrette. Gently pile a quarter of the salad onto each of four small plates. Garnish each salad with chives.


Monday, April 25, 2011

Putting Christmas Gifts to Good Use

Of late I've taken a serious interest in charcuterie, it started simply enough, with a Christmas gift, a book called Flying Sausages, and is starting to spiral into full blown obsession (I have 2lbs of pork belly in the freezer I'm planning to turn into bacon soon).


For now my obsession may be limited to simple things, since I lack a smoker, a place to cure things and really the guts to try to make some of the items in my cookbooks, instead I have opted to make bulk sausages and just purchase delicious treats from local producers such as Dai Due and Kocurek Family Charcuterie . My first foray into sausage was a Chicken Apple Sausage, adapted from Flying Sausages and used in my Turkey Apple Meatballs.

Chicken Apple Sausage
Adapted from Flying Sausages by Bruce Aidells and Denis Kelly

1 Cup Apple Cider
3 1/2 Lbs Ground Chicken
6 oz Dried Apples, Chopped
6 Tsp Kosher Salt
3 Tsp Freshly Ground Black Pepper
3 Tsp Ground White Pepper
2 Tbsp Rubbed Sage
1 Tsp Ground Cinnamon
1/2 Tsp Ground Nutmeg
1/2 Tsp Ground Ginger
1 Cube Chicken Bouillon Dissolved in 2 Tbsp Boiling Water

1. In a non-reactive sauce pan boil apple cider until it is reduced into a syrup, only about 2-3 tbsp should be left. Cool and reserve.
2. Add apple cider and remaining ingredients to the chicken, blend thoroughly with hands.
3. Make a small patty, fry it in a skillet to test seasoning/flavor. If it needs extra seasoning mix additional seasonings into the raw chicken. Once desired flavor is reached, portion it into ziploc bags and freeze or use immediately.

Pictures of raw loose sausage aren't pretty so you'll have to wait and see what the recipes using it look like : )

Tuesday, April 19, 2011

Bucking trends...

I have never been big on following the trends, I've never cared too much to go buy the latest clothes (although I don't think I'm unfashionable, guess that's easy to say since I'm the one judging myself) and truth is once I find something I love (be it clothing, furniture, etc.) I could care less if it's 'trendy' it's something I will hang on to as long as I can. So when bacon hit the radar as 'trendy' I was a little sad to say the least, I've been a bacon fan as far back as I can remember.

As a small child my great grandmother (I've been a lucky girl who has known great grandparents and grandparents on both sides of the family) would take me to the grocery store with her and spoil me rotten...she let me pick out whatever my heart desired and at a very young age she taught me how to make bacon (in the microwave, because who trusts a 5 year old with the stove!). My poor mother was probably a bit horror stricken, she's not a huge bacon fan and really was a health-nut most of my childhood. Coming to my great-grandmothers to find her 5 year old happily nuking bacon was likely a bit of a shock. I always adored my great grandparents, bacon or not and have very fond memories of summers at their home, including my great-grandfather's huge veggie garden which continues to inspire me today.

I speak of this not to brag about the fabulous family I grew up with or the fact that I was lucky enough to know great grandparents but to prove my bacon pedigree. I have long been a fan and so when it became a trend, when it hit all the 'food' shows I was a bit sad. I suddenly looked like everyone else who loves bacon, as if I jumped on the band wagon, I'm here to say I was an early adopter! For those of you who have read my blog before you'll see that bacon is ubiquitous in my cooking, not so much so that I'll be suffering a major heart attack anytime soon but it's definitely present and has been since before bacon became the 'it' food.

Now that I'm done trying to prove myself, the purpose of my rant is really to share with you something delicious, slightly unexpected and a condiment that stands on it's own, bacon jam! Yes, I know it's been done, especially since the 'trend' began but this is my version, a little bit of heat, a little bit of sweet and a good solid dose of smokiness.

Bacon Jam
1 lb Thick Cut Smoked Bacon
1 Large Sweet Onion, Cut into 1/4 inch rounds
3 Cloves Garlic, Minced
1 Adobe Chipotle Chile + 1 Tsp Chile Sauce from the Can
1/4 Cup Maple Syrup
1/4 Tsp Ground Allspice
1/4 Tsp Ground Cinnamon
1/4 Tsp Ground Nutmeg
1 Tbsp Shaved Dark Chocolate (at least 75% cocoa) or 2 Tbsp Dutch Process Cocoa Powder
1/2 Cup Dark Brown Sugar
3/4 Cup Strong Brewed Coffee (I prefer to use Pecan Flavored Coffee)

1. In a large dutch oven cook bacon over medium high heat until crispy on the edges but tender in the center. Remove from pot, set on paper towels to drain excess grease. Remove all but 1 Tbsp of rendered fat from pan. Chop bacon into half-inch pieces.
2. Decrease heat to medium-low and add onion and brown sugar. Cook until onions are well caramelized, stirring frequently for approximately 20 minutes.
3. Add garlic and remaining spices (including chiles and adobo sauce), saute for 5 minutes.
4. Add liquids and bacon back to pan, increase the heat to medium and bring to a boil. Let boil 3 minutes.
5. Decrease heat to low and simmer for 2 hours, stir every 15-20 minutes.
6. If mixture become too dry add water by the tbsp to keep mixture from burning and sticking. Final texture should be moist and sticky, like a jam.

I should have far more interesting photos than the jar full of jam but you see it's been consumed so fast I really forgot....you should feel lucky I snagged these pictures : ) This is delicious in so many ways, on an egg sandwich, a BLT (instead of the bacon), just on a piece of bread as an appetizer...possibilities are endless!


Slight disclosure here, while I've been planning to share this post for a while it also coincided with a Foodbuzz program/contest called Baconalia.