Showing posts with label foodbuzz tastemaker. Show all posts

Friday, April 15, 2011

Spring Cleaning, Blogging Catch-Up & New Belgium Beer

The last four weeks have been filled with home improvement projects (who knew you could spend that much money at Home Depot??), gardening and unfortunately widsom teeth pulling! I've been a little lax on my blogging since March but here's the beginning of catch-up time. In my aforementioned home improvement and gardening projects I had my coutnertops replaced (yipee!!), put together two large and beautiful raised garden beds that will hopefully mean bushel-fulls of fresh veggies this summer and arranged to have the flooring replaced (coming at the end of April). With all of that going on I also needed to have my wisdom teeth pulled (ick) so that was yesterday morning fun, now I'm going to play catch up here, because you can't see my puffy swollen cheeks and I miss having regular blog posts.

Knowing now that I'm playing catch up I warn you that most of the recipes I'll be posting over the coming weeks are not seasonal, they are things that have built up on the camera and in my recipe list for the last few months, but they are still uber tasty! First up on the list, a delicious weeknight meal courtesy of the Foodbuzz Tastemaker Program and New Belgium Beer, a favorite of mine. New Belgium brews up some delicious beers, some of my favorite include Mothership Whit, Fat Tire and the star of today's recipe, Abbey. In searching for a good way to incorporate Abbey into the meal I started contemplating a few options, the ever-tasty beer bread, maybe some kind of marinade, then I realized that I wanted to use it in more than one way so I dug deep and came up with Beer-Poached Chicken Mole tacos. Who doesn't love beer and tacos after all?


Beer-Poached Chicken Mole Tacos

8 Chicken Thighs (Bone-in, Skinless)
1 New Belgium Abbey Beer
1 Dried Ancho Chile
2 Bay Leaves
*Prepared Mole Sauce
1 Large Avocado, Sliced
1/2 Cup Chopped Cilantro
Pickled Red Onions
Tomato Slices
Corn Tortillas

1. In a large pot/dutch oven place the chicken in the pot with the bay leaves and ancho chile, then pour beer over the top. Bring up to a boil over medium-high heat. Let poach until chicken is cooked through (appx 15 minutes).

2. Set chicken aside, remove bay leaves and chile from the beer. Once chicken has cooled down, shred it with a fork. Place left over poaching liquid in a separate container (you'll need to use it to thin out the mole).

3. Keeping the heat turned off, add mole to the pan, slowly add poaching liquid until you have thinned the mole to desired consistency. I have adopted a practice my mom has with pre-prepared mole, adding about 1.5 Tbsp creamy peanut butter to it. It adds depth of flavor and just makes it a richer tasting dish. Once the mole has reached the consistency you like (I recommend you keep it about the consistency of an alfredo sauce, but not too runny), mix in the chicken.

Serve in tortillas, corn works well, topped with cilantro, onions and avocado slices! Enjoy with your favorite New Belgium Beer. As for the pickled red onions, I used some that my mom posted on her blog, they are addictive, I swear I've been finding ways to use them on everything! Check them out, you'll love them too!

*If you're feeling up to the challenge you can make your own mole, there are a number of fabulous recipes available, on a week night I wasn't all that ambitious and instead I used a great prepared mole sauce and thinned it out with some of the poaching liquid.

Monday, March 14, 2011

For the last meal in my series featuring Texas Beef Council Beef I wanted to do something relatively quick, easy and family-friendly. I say all this with a caveat (and possible rant), growing up family-friendly was any meal, my mom didn't tolerate or raise picky eaters so whatever the 'adult' meal of the evening was, chances are it was the kid meal too! While this isn't how everyone is raised I do feel strongly that healthy food that isn't 'kid' food is a must so I find it important to share things that I think even mildly picky eaters would enjoy : )

Greek Beef Kebabs

Ingredients:
For the kebabs:
2 lbs. ground beef
2 cloves garlic, finely minced
1/2 cup bread crumbs
1/2 cup chopped fresh parsley
1/2 tbsp. cayenne pepper
1 tsp. cumin
salt and black pepper to taste


For the yogurt sauce:
1-1/2 cups Greek yogurt, strained
1 tsp. paprika
3 tbs. olive oil
1/2 tsp. salt
1/2 a large seedless cucumber (or regular one seeded), diced finely

For the tomato sauce:
3 tbsp. olive oil
1 large onion minced
1 clove garlic, minced
1 can diced tomatoes (15 oz.)
1/2 tsp. sugar
1/2 tbsp. vinegar
1/2 tsp. cayenne pepper
pinch of ground clove
1 cinnamon stick
salt and pepper to taste


Prep the kebabs:
1. Combine the ingredients very well in a large bowl if you have time chill them to allow the flavors to meld, otherwise shape them and place them in a greased (13x9) baking pan.
2. Preheat the oven to 375 degrees. Once oven is heated to correct temperature, bake meat ball/kebabs for 35-40 minutes, or until browned and cooked through.

Make the sauces:
1. To make the yogurt sauce by combine all the ingredients in a bowl and mixing well with a whisk. Set in fridge to chill.

2. Prepare the tomato sauce. Heat the olive oil in a saucepan. Saute the onions until translucent. Add the garlic and diced tomatoes with their liquid. Add the sugar, vinegar, cayenne pepper, clove, cinnamon stick, and salt and pepper.
3. Simmer for 30-45 minutes.


The nice thing about this meal is that it can all be done at the same time. I served this with warmed pita and some veggies, it was super simple and very tasty, it also made great leftovers!

Wednesday, March 9, 2011

When a house becomes a home...

For a little over a year and a half now I have been living in a great house in a suburb of Austin, my little yellow dog and I have rented it and have grown to love it, so at the end of last year when the management company asked if I'd be interested in buying it (something I'd not really considered as a possibility even) I jumped. As of early February I am now a homeowner! While signing what was the biggest loan of my life (eek) I immediately began wondering how I would celebrate this massive accomplishment....my thoughts turned to the Texas Beef Council challenge I've been participating in and thus Beef Tenderloin with Cherry Balsamic Glaze graced the table.


I served the delicious and amazingly tender beef tenderloin with some very easy sides (roasted red potatoes and sauteed brussel sprouts) so that the meat and sauce could really stand on their own. While it's no cheap date, this tenderloin is well worth it!

Cherry-Balsamic Glaze

1/4 C Balsamic Vinegar
1/4 C Dry Red Wine
1/4 C Cherry Butter

Add all together in a sauce pan, cook down until sauce thickens, appx 20-30 minutes, stir regularly so that nothing burns to the bottom of the pan.


To roast the tenderloin I preheated the oven to 425. Roast at 425 degrees for 40-50 minutes until thermometer reads 140 degrees F minimum. Remove from oven and let stand, covered with foil, for 15 minutes.

,

I hope you all enjoy this as much as I did the evening that I celebrated my purchase of a little piece of Texas!

Thursday, March 3, 2011

Happy Independance Day Texas!

As if it were any secret, I'm a big fan of my state, actually I'm really proud of my family too (see the two are pretty well intertwined). Texas is the only state in the union to have been its own country, we even had embassies outside the US! March 2 is the 175th anniversary of the signing of the Declaration of Independence for Texas. Fifty-nine brave men put their names on the Declaration and countless others stood up to fight for Texas' right to be a Nation.

While the Republic of Texas only made it 10 years before annexation, it came to a close under the stewardship of a relative of mine, the last President of the Republic of Texas, Anson Jones. I am a direct descendant of Anson Jones on my father's side and have always been fascinated by the idea of Texas as a country. When I was younger (elementary school to middle school) we lived in the Ft. Lauderdale FL area, many times I would try to explain to other kids why it was so cool that I was related to this Anson Jones character, let's just say that outside of Texas it didn't translate at that age. Thank God I moved back to the mother country, here my thrill of being related to this historical figure isn't some oddity but instead something to be celebrated. So on March 2 each year we Texans celebrate our one-time independence and the characters who made that possible.


In honor of all who fought for Texas' freedom from Mexico, governed this great state as a Republic and to the amazing achievements since that day we celebrate! What celebration of the state of Texas would be complete without beef?? None! As the second installment of my posts featuring Texas Beef (care of the Texas Beef Council and Foodbuzz Featured Publishers' Programs) I would like to share a simple and tasty flank steak recipe that translates into not one, but two meals!


First, Coffee Crusted Flank Steak, originally this was served along side some of last summers pickles, pickled okra and a roasted potato.

Coffee Crusted Flank Steak
4 Tbsp Instant Coffee
2 Tbsp Black Pepper
1 Tbsp Dutch Processed Cocoa (Unsweetened)
1 Tbsp Ground Cumin
2 Tbsp Ground Dried Wood-ear Mushrooms
1 Tbsp Kosher Salt

Mix all ingredients together and rub generous amount on steak, grill steak to your desired done-ness.


The second way I used this tasty flank steak was in a leftover capacity, I turned it into a Philly Cheesesteak Pizza, here I used a ready-made crust for simplicity but a homemade one would be delicious too!


Philly Cheesesteak Pizza

1 Ready Made Thin Crust
4-6 oz thinly sliced Coffee Crusted Flank Steak
2.5 Cups Cheddar Cheese
1 Red Bell Pepper, Thinly Sliced
1 Green Bell Pepper, Thinly Sliced
1 8oz Container Mushrooms, Sliced
1/2 Large Onion, Thinly Sliced

1. Preheat oven to 450 F.
2. Saute onions for 5 minutes, until they start to get translucent.
3. Add bell peppers and saute another 3 minutes then add mushrooms and saute until they are starting to get cooked.
4. Spread veggie mix on pizza crust, top with cheese, layer steak slices atop cheese and bake 12-15 minutes, until cheese is bubbly.


One last recipe to share utilizes one of my favorite Texas-born products, Dr. Pepper (are you a Pepper?), this recipe is an oldie that many of you are familiar with, the special twist is the addition of a syrup found at one of my favorite haunts, Sarah's Texas Pantry, Dr. Pepper Syrup.

Dr. Pepper Bread Pudding


Bread Pudding:

1 loaf French bread, at least a day old, cut into 1-inch squares (about 6-7 cups)
1 qt milk
3 eggs, lightly beaten
2 cups sugar
2 Tbsp vanilla
1 cup dried tart cherries, soaked in Dr. Pepper overnight
3 Tbsp unsalted butter, melted

Dr Pepper Syrup to sauce the finished product with!

1. Preheat oven to 350°F.
2. Soak the bread in milk in a large mixing bowl. Press with hands until well mixed and all the milk is absorbed. In a separate bowl, beat eggs, sugar, vanilla, and spices together. Gently stir into the bread mixture. Gently stir the cherries into the mixture.
3. Grease a 13x9 pan very well with butter or cooking spray. Pour in the bread mix and bake at 350°F for 35-45 minutes, until set. The pudding is done when the edges start getting a bit brown and pull away from the edge of the pan.

Tuesday, March 1, 2011

Texas Beef meets Aussie Pies

Of late I have been inspired by things around me, either restaurants in the area, food trucks who provide amazing goodies to us office dwellers at lunch or grocery stores/farmers markets. I am fortunate to be surrounded by amazing food and ingredients and have great inspiration. Our office has recently started having visits on Mondays by an Austin company called Boomerang Pies, each Monday they bring their little truck around and pull up outside our office and for about $5 you can get one of many tasty concoctions, my current favorite is the Thai Chicken, mmm just thinking about it makes my mouth water. I share this for two reasons, one because I love that Thai Chicken pie and two, because a cool Austin based company is now featured at Whole Foods, yup some of the Southern States Whole Foods will now stock these beauties! **Just to be clear, my endorsement of these tasty pies is wholly my own, no one from Whole Foods or Boomerang knows, has asked for or paid for my ringing endorsement.

For those of you who aren't lucky enough to live in the South ;) you'll just have to make your own pies. Thankfully I recently was selected to participate in a fabulous Foodbuzz Featured Publisher program for the Texas Beef Council and thus had ample beef with which to make a meat pie! This post is one in a series of four that will be focused on some of the fabulous lean cuts available from Texas Beef Producers, I am lucky enough to be smack dab in the heart of the great state of Texas and have ample product available to fill at least four posts with!

So, back to the meat pies. the Aussie Meat Pie became known as the 'national dish' of Australia back in 2003 when then Premier Bob Carr declared it as such. The meat pie a hand-sized treat containing largely diced or minced meat and gravy, sometimes with onion, mushrooms, or cheese. Imagine a version of a Hot Pocket that isn't fully of random processed foods but instead holds goodness and warmth and gravy! How can you make one of these you ask? Well, let me share my version of a Guinness pie...


Aussie Meat Pies
3 lbs Beef Chuck Roast, diced into 1/2 inch cubes
1/2 Cup Flour
3 Tbsp Vegetable Oil
2 Cloves Garlic, Minced
1/2 Large Onion, Diced
2 Tbsp Black Pepper
1 Tbsp Ground Coriander
1/4 Cup Worcestershire Sauce
1/4 Cup Soy Sauce
1 14oz Bottle Guinness, or other stout beer
4 Sheets Frozen Puff Pastry, thawed and pliable
1 Egg, beaten


1. Preheat oven to 400 F.
2. Dredge beef in flour and brown. Add garlic and onion and saute for 4 minutes. Add spices, stir well.
3. Add Worcestershire sauce and soy sauce, cook until liquid is nearly gone.
4. Add beer, cook until meat is coated in a thick gravy.
5. Slice pastry into four pieces, spoon mixture into pastry and fold over to form a turn-over type shape. Place on parchment or silicone baking mat on baking sheet.
6. Brush with egg wash, sprinkle additional black pepper over the tops. Bake approximately 8 minutes or until golden brown.

Serve hot!


These were gone in a flash and got my wheels spinning on other great combos to fill the pastry with!

Monday, January 31, 2011

Foodbuzz Tastemaker: ConAgra

I know I've sung the praises of Foodbuzz a few times now in posts about cool products that I've had the pleasure of testing through their Tastemaker Program but I am here to do it again, this time it's some items that are well loved pieces of most home cook's repertoires, peanut butter (specifically Peter Pan) and Rotel. I recently was fortunate enough to receive a nice package of ConAgra products (in addition to the aforementioned there was a nice big can of PAM spray and a can of Hunt tomatoes that will surely see chili soon!) and a super cool HD Flip Cam! Normally I would do anything to keep myself behind the camera instead of in front of it but the stipulation was that part of the deal was to film some of your favorite SuperBowl recipes...so in front of the camera I got stuck! Oh well, just don't make fun of me and somehow I'll survive :)

While I only provided footage of one recipe, I made a number of 'Bowl' recipes that I wanted to share, for those of you who know me, pro football isn't usually my shtick but since the Horns were in a pretty sorry state this year I have to watch something!

As I pondered what to do with my ConAgra bounty I realized the easy (and fun) course of action involved preparing a dish for each team playing....and of course I can't forget a "Dallas" dish to honor the Jerrydome where it's being held and lastly I had to pay a little homage to the Saints as the last champ.

So without further adieu, in the order that they were served:

As a tribute to the Steelers:

Terry Bradshaw's Blue Cheese Chips
*This was modified to make it slightly less calorie laden

12oz Thick Cut Kettle Chips
2oz Blue Cheese Crumbles
1/2 cup Bacon Crumbles
3 Green Onions, sliced on a bias, green parts only
1/2 Red Bell Pepper, roasted and then diced
Seasoned Sour Cream (recipe to follow)

1. Spread chips evenly on an oven safe dish. Dollop with sour cream and then sprinkle bacon bits over the top. Bake at 350 for 2-4 minutes.
2. Remove from oven and sprinkle with remaining ingredients.

Seasoned Sour Cream
6oz Light Sour Cream
1oz Mayonnaise
1 Tsp Lemon Juice
1/2 Tsp Worcestershire sauce
1/2 Tsp Garlic Powder
1/2 Tsp Paprika
1/2 Tsp Celery Salt
1/2 Tsp Cayenne
1//8 Tsp Curry Powder


While it's not my creation these were a certain hit, everyone loved the chips and they complimented the traditional buffalo wings well!

As my tribute to the Packers:
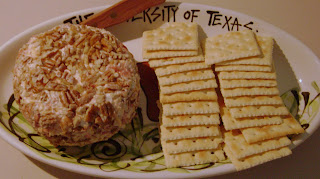
Spicy Cheesehead Cheddar Ball
8oz Softened Light Cream Cheese
1/2 Tsp Cayenne
1 14oz can well drained Rotel
4oz Sharp Cheddar Cheese, shredded
1/2 Cup Bacon Crumbles

Mix all together, shape into a ball, wrap in plastic wrap and chill overnight. Serve with crackers


While I, like many of my Texas-brethren, am conflicted in my feelings about the new home of the Cowboys I can't deny that it's a pretty fab home for this years SuperBowl, so in homage to the Stadium:

Jerrydome (Cowboy Stadium) Tex Mex Pizza
1 Cornmeal Pizza Crust (recipe to follow)
1/2 14oz can rinsed and drained black beans
1 14oz can Rotel Tomatoes
8oz shredded cheese
1 1/2 cups Cilantro Pesto (recipe to follow)
(Fajita meat would be good but I didn't use any)
1/2 Medium Red Onion, thinly sliced

Layer pesto, cheese and toppings onto crust, bake at 500 for 8-10 minutes.

Cornmeal Crust
2 Tsp Active Dry Yeast
Pinch Sugar
2/3 Cups Warm Water
1 2/3 Cups All Purpose Flour
1/4 Cup Cornmeal
1 1/2 Tsp Salt
2 Tbsp Olive Oil

1. Sprinkle yeast and sugar over warm water and let it bubble/foam up (takes appx. 10 minutes).
2. Mix flour, cornmeal and salt together in a large bowl, make a well in the center and add in yeast mix.
3. Knead well for 7-10 minutes then set aside in a warm, draft-free location for 1 hour or overnight in the fridge.

Cilantro Pesto
1/4 Cup Toasted Pecans
2 Cloves Garlic
2 Cups Cilantro Leaves
1/2 Cup Olive Oil
2 Tbsp Lime Juice
1 Tbsp Lemon Juice
1/2 - 1 Tsp Hot Sauce
Salt & Pepper to Taste

Blend all together in a blender or food processor until desired consistency.


Last but certainly not least, as a fond reminder of a city that is dear to my heart and the underdogs who showed everyone last year, New Orleans Saintly Peanut Butter Pie!

New Orleans Saintly Peanut Butter Pie
1 8oz light cream cheese, softened
1/2 Cup Sugar
1 Cup Peter Pan Peanut Butter
8oz Light Whipped Dessert Topping, at room temperature
1/2 Tsp Vanilla
1 Cup Pretzels, crushed
3 Tbsp Butter, Melted
Chocolate, optional to shave over the top.

1. Mix crushed pretzels and butter and press into pie plate, bake at 350 for 8-10 minutes. Remove from oven and let come to room temperature.
2. If desired, drizzle melted chocolate over the bottom of the crust and allow that to set as well.
3. Mix cream cheese, sugar, peanut butter, vanilla, and whipped topping together very well (so no lumps exist) then pour into shell and chill overnight.
4. Shave chocolate over the top the next day if desired.


I wanted to give one big THANKS to Foodbuzz and ConAgra for the neat package of stuff I got to use to show-off some favorite Football foods, hope everyone has a Happy Superbowl!

Wednesday, November 17, 2010

Tailgating, it's not just for football

While many tailgate I venture to say none compare to the frequency or voracity of Texas tailgaters, for example, at any given Longhorn sporting even you are likely to see many RVs decked out (I know that's normal), a school bus or two that have been purchased and converted to classic cars be-decked with Horns, it's Texas, everything is bigger. However, tailgating is not simply limited to football, baseball, basketball, volleyball and just about every other sporting event imaginable can be celebrated at a tailgate. Frankly anything can be celebrated at a tailgate, one of the funniest (and scariest) things I've read lately on Wikipedia "(tailgating) is also used at non-sporting events such as weddings and other non-sports-related barbecue gatherings."

While I'm not about to propose wedding tailgating, to illustrate my point, we recently tailgated a regatta my boyfriend participated in! While that was celebrated at a local restaurant, we did tailgate the Longhorn football game this past weekend, while the Horns came out a little worse for the wear we at least enjoyed some tasty food and nice cold beer.

Our tailgate was an amazing combination of foods, some of which I have Hormel and Foodbuzz to thank for! In mid October Hormel and Foodbuzz sent out an invitation to participate in the Foodbuzz Tastemaker program by sharing Hormel products with friends and family (I know I get all the tough jobs!) so tasty pork dishes were my contribution to the Tailgate fare!

First, using the Hormel Always Tender Original Pork Tenderloin, Jalapeno-Honey Glazed Pork Kebabs.

Jalapeno-Honey Glazed Pork Kebabs

1 12-ounces pork tenderloin
1/3 cup honey
3 tablespoons light soy sauce
1 tablespoon toasted sesame oil
2 fresh jalapeno chile peppers, seeded and finely chopped*
1 tablespoon grated fresh ginger
1/4 to 1/2 teaspoons crushed red pepper
2 Medium Red Onions, Cut into Chunks
1 Cored, Cubed Pineapple

1. Trim fat from pork. Place pork in a resealable plastic bag set in a shallow dish. For marinade, in a small bowl, combine honey, soy sauce, sesame oil, the chopped jalapeno peppers, the ginger, and crushed red pepper. Pour marinade over pork. Seal bag; turn to coat pork. Marinate in the refrigerator for at least 12 hours or up to 24 hours, turning bag occasionally.
2. Drain pork, reserving marinade. Cube pork and place place on skewers interspersed with pineapple and red onion.
3. Grill until pork is cooked through, brushing with marinade periodically.
4. Oven Directions: Prepare as directed in steps 1 and 2. Place pork on a rack in a roasting pan. Roast in a 425 degree F oven for 25 to 35 minutes or until juices run clear (160 degree F), brushing once with reserved marinade after 10 minutes of roasting. Discard any remaining marinade.


In addition, with some of the bite-sized Hormel Turkey Pepperoni's some Mini-Pepperoni Rolls, you might recognize the dough as the same dough my Mom and I used in our Foccacia:

Bite-Sized Pepperoni Rolls

1/2 Batch of Olive Oil Dough (recipe below)
2 Packages Hormel Turkey Pepperoni bite-sized
1/2 Cup Shredded Mozzarella Cheese
1 Tbsp Dried Oregano
1 Tbsp Dried Basil

1. Preheat oven to 425.
2. Using 1/2 of Olive Oil Dough, roll out a large rectangle, cover rectangle with a mixture of cheese, pepperoni and spices, roll dough carefully keeping all ingredients inside of the roll.
3. Cut roll into hand-sized pieces, brush top with egg wash.
4. Grease a cookie sheet with olive oil or line with parchment paper. Bake 20 minutes (or until golden brown). Brush tops of rolls with melted butter or olive oil if desired.


Olive Oil Dough
Makes 4-1lb loaves.

2-3/4 cups lukewarm water
1-1/2 tablespoon granulated yeast
1-1/2 tablespoon salt
1 tablespoon sugar
1/4 cup extra virgin olive oil
6-1/2 cups unbleached all-purpose flour

1. Mix the yeast, salt, sugar, and olive oil with the water in a 5-quart bowl, or a lidded (not airtight) food container.
2. Mix in the flour without kneading.
3. Cover (not airtight), and allow to rest at room temperature until dough rises and collapses (or flattens on top), approximately 2 hours.
4. The dough can be used immediately after the initial rise, though it is easier to handle when cold. Refrigerate in a lidded (not airtight) container and use over the next 12 days.

For this crowd I doubled up both recipes, serving two tenderloins worth of kebabs and a double batch of pepperoni rolls it was a tasty treat for our tailgate!